

As promised, I finally squeezed photographing time out of pre-school this morning and shot how to make this Dresden Skirt.

First, gather your materials.
* An old pair of kid pants or shorts that you don’t mind cutting off (upcycling).
* Scraps of fabric, or all one color if that flips your skirt.
* Cutting mat, grid, thread, rotary cutter, soda of choice, tunes, etc.
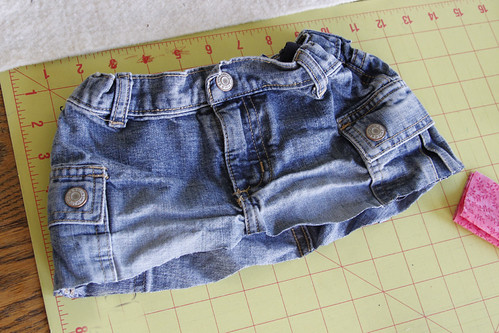
First cut the bottom off the pants all the way around. I tried to leave a little extra in the back the first time I made this, but the second time I didn’t, and the shape seems pretty forgiving either way.

Now, cut your fabric into strips of uniform length and relatively uniform width. I have done one skirt with identically sized strips, and one with varied widths. Both were fine. Fold these strips in half, and cut them on a gentle diagonal, as pictured above and below.

If you are OCD, you can use this first one as a template for your others.

If you are me, you can use it more like the pirate law, more of a “guideline”.

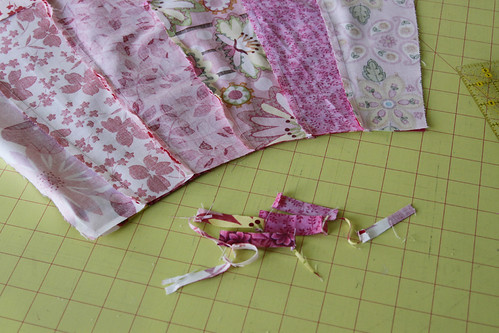
Once you have them all cut, admire your great taste in fabric scraps. Then fold them, Right Sides Together, and sew along the bottom of the wider end of each strip. I like to do it in a chain to save thread.

Once your chain is clipped apart, clip the corner of each strip as pictured below. This will make the Dresden corner lay flatter when you press it down.

Press that straight seam you just made down into a triangle, like below except inside out, like one more picture below. I just threw that extra photo in to confuse.

See the nice triangle? It took my mind awhile to wrap around sewing at 90 angles and ending up with triangles, but there you have it.

See? If you have OCD, at this point, you might want to zigzag across the bottom of that little triangle to prevent fraying when the skirt is complete. I am trying to overcome my OCD, so mine will be fraying extensively in the wash. (Read, I am lazy, and I embrace that.) Now press that baby down, and you’ll have one of the petalish things for the skirt.

Aw, isn’t it cute?
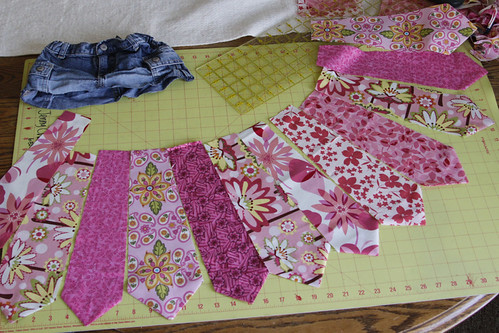
Once you’ve pressed all the petalish things, lay them out and put them in an order you like.

Then sew all of your strips together in your chosen order. Make sure you line up the corner as pictured above if your widths are varied. I did quarter inch seams on this part, as well as on the other seam we’ve sewn so far. Don’t sew it the last two together yet.

Admire your work so far.

Place your un-sewn-together skirt under the pants top, to see if it is wide enough. Mine wasn’t, so I had to add two more petal pieces. I’m a hack. I know.
Once the skirt is of adequate coverage, lay it down and trim the top so it is nice and even, and then you can sew that last side together to make the complete skirt tube.

Pin the tube to the pants, right sides together, and sew around the waist. You might think you are done at this point, and hang the skirt and photograph it, but then you will realize that you forgot the last thing. Topstitching!

Press the skirt down. Topstitch it to the pants top. Then topstitch around your corners on the bottom of the skirt, too.

And there you have it! I took this skirt to my weekly play date at the park so I could show it off to my friends, and when I wasn’t looking, my daughter put it on under her other skirt, even though it is a size too big right now and goes to her ankles. I’m just glad she likes it, and I hope your munchkins will, too. If you make one, be sure to link to it in the comments so we can all enjoy.

This is SO cute. If I were a little girl, I would wear it every day!
Also… can’t mems if I already said this, but I think you’d like:
http://www.madebylex.com/
Now *I* want a sewing-exclusive blog. That I can post on 3 times a year.
That’s really cute. I’m not surprised she doesn’t want to have to wait to grow into it.