New WIP

I am working on another little quilt in my spare time. And by spare time I mean the laundry I usually complete on Monday is still sitting in baskets on my bed waiting to be folded because I was quilting instead. It’s the corona virus pandemic. We all have to do what we have to do to SURVIVE!

Anyhoo, here are some pictures. It is all quilted and just waiting for binding. I have the binding ready, but my dearest, best friend Bernina and her baby walking foot are in the shop being repaired.

31AEA641-E500-45EE-BE06-5A516FE99BBD73B04A8F-68D6-4129-A615-CE5E95835518

WIPS and other things

IMG_7296

Hello friends, this is a quilt I just finished. It was inspired by two different beauties I saw on Pinterest.  You can see the first one here, and the second one here.  I couldn’t find the pattern on Sassafrass lane for the first one this time, but I could swear it used to be there. I did the polka dot binding on a whim, and now I have second thoughts about it, but oh well. I love the idea of a mountain and sky scene. This one is so basic. I might try another one in this style in the future.

Below are a couple of pictures of my works in progress.  I found a cute stack of 5″ pre-cuts that I’m making into a small quilt with blue for the negative space. Here you can see me chain stitching away …IMG_7291
And I am so excited to have put this Christmas quilt together at last. I don’t know how many years it has been since our Quilt Guild did this block exchange. We each made 12 of the same blocks, a 12×12 & a 6×12 or two 6×6’s.  We did it in gemtones, and I loved how it turned out. It is very unusual in that the styles are all quite different, but it reminds me of all of my quilt guild friends, so it will be a treasure for me. I plan to bind it in a solid black.  Hopefully before Christmas, haha.
IMG_7292

Record Fast

My sister in law came to quilt today, so I thought I’d take a couple of pictures of the process and share what it’s like to use a long arm machine.

IMG_6481

This is the quilt when it is first loaded on the machine. This is the reason you need the back of the quilt and the batting to be larger.  The front will lie on them, and may travel as you quilt it. The extra space keeps you safe from going off of the edge.

Using the Long Arm

Isn’t her quilt magnificent? It is Moda’s Nest Fabric, with nesting stars.  I may have died of cuteness, but then I wouldn’t have been able to help her use the machine.  She is an unusually fast stippler. This is a large, king sized quilt, and she stippled it in less than five hours. If you are thinking you can do that, I would pause and try it first. I am pretty sure I could not do it that speed, and I’ve had a lot of practice.  That is the fastest I’ve seen one done on this machine.

IMG_6485

I love that she hand stitched a little inscription here. Always sign your work, friends.


IMG_6487This is what the edges of the quilt look like when it comes off of the long arm machine. The quilt is ready to be trimmed, and then bound. There is a line of stitching around three sides of the quilt, and the fourth side is basted together. I always trim these edges so the stitching will be inside of the quilt binding. Up in the corner of the photo is a non matching scrap I used to test tension. That’s the other reason you need the backing and the batting to be bigger.  Long arm machines need the tension adjusted if there are variances between sizes of battings, threads, etc.

Any questions? Shoot me an email, or comment.

Next Project – Great Grandma’s Double Wedding Ring Quilt

Great Grandma Rooks Quilt insides-2

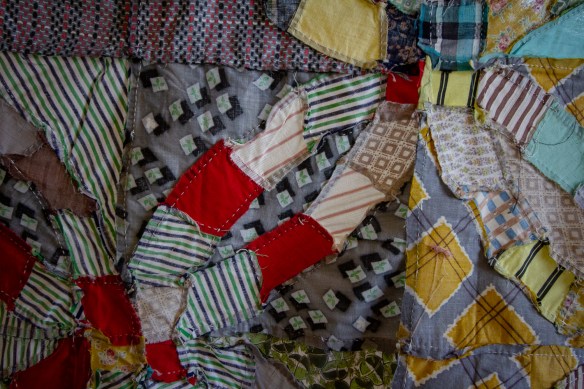
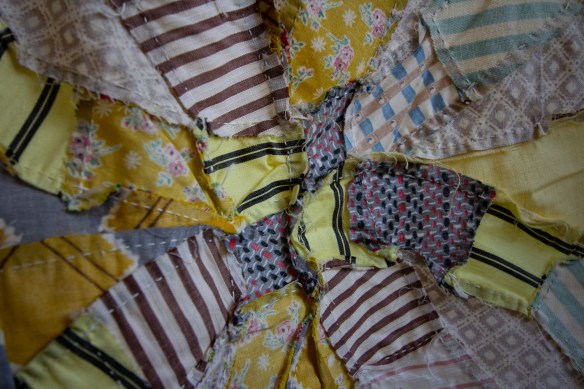
I don’t know the entire story of this quilt, and it fills me with questions. How old was my great grandma when she  made it? How long did it take her? Where did she get all of this wild fabric?  I feel like my grandma may have said the fabrics were her old shirts and dresses at one point. I called Grandma this week to ask her some details about the border, which was sewn on by machine. I thought she told me once that she sewed the border on, but I can’t remember now, and she can’t either.
Great Grandma Rooks Quilt insides-3

There are a few things I do know about this top.

1. It’s very colorful and mismatchy.

2. I like it a lot.

3. The pattern is called a double wedding ring.

4. Double wedding rings are very hard to sew.

5. It was pieced probably before I was born, and all by hand.

6. It sat in my Grandma’s closet for a long time.

Great Grandma Rooks Quilt insides-4

I think the quilt came to me with very interesting timing. It started like this. My sister in law loves quilting  and family history. A few years ago, she gave me a miniature double wedding ring template for my birthday. The template is acrylic, so I could cut the pieces with my rotary cutter. I thought that to start I would try making a 3 ring oversized hot pad for my mom for Christmas.

Great Grandma Rooks Quilt insides-6

By the time I was done mangling my three ring hot pad into existence, I realized that I don’t have the skill level to make a full wedding ring quilt—much less a miniature one! I decided that if I tried it again, it would be with a teacher and a class.

While I was still finishing my wrinkly piece of mischief, my mom and grandma were cleaning out a closet, and found this top and gave it to me. I decided that if our ancestors are watching over us, Great Grandma was watching over me, waiting for me to try a wedding ring quilt so I would not judge her craftsmanship.

It’s not perfect, but it is whole. I am so glad it came to me. It took me two years to get up the patience to think I could hand quilt it, but I have got it basted and ready now. I took these pictures to chronicle the hand work inside, because that is one treasures of this quilt that will be hidden once it is quilted.
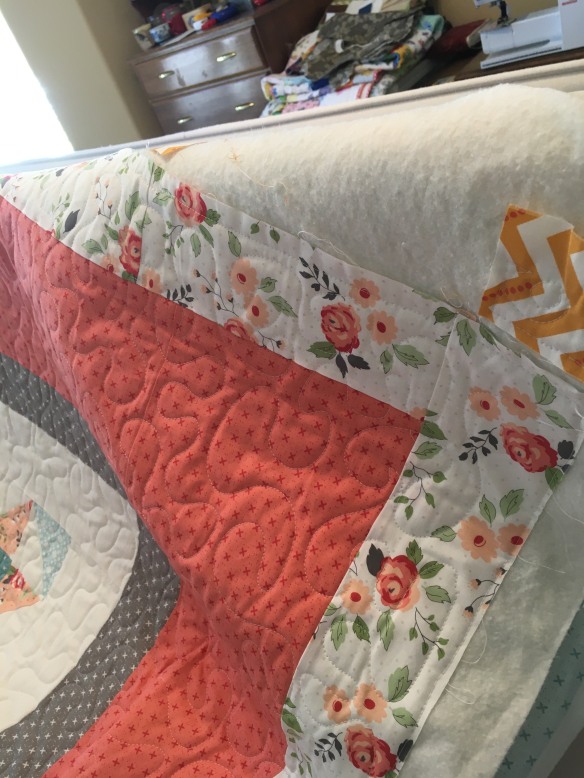
Great Grandma Rooks Quilt insides-7

Binding my Quiet Book

Right now I am working on binding my book. I was going to sew the pages right-sides together and then turn them inside out, but someone mentioned using normal binding for them. I have so many scraps of binding, and I love scrappy-looking anything, so I am binding.

qb rings

I bought some 2″ book rings, and tent/tarp grommets, and went to work. I have a few notes for if I ever work with grommets again:

* The hole punch that came with my grommets didn’t work on a cutting mat, but a scrap of carpet or felt underneath helped it make a small cut. Then I used scissors to finish the hole.

* Hammer lightly at first, and be careful to hold the top applicator straight at a 90 degree angle. I hammered really hard at first, and the grommet edge cut the fabric edges around them. I recommend trying a few test ones before doing it on the actual product.

* Half inch grommets are pretty big, but for 12″ pages with brightly colored binding, it doesn’t look too bad. I would like to check a hardware store next time. I just ordered them on Amazon this time.

* If I make another book I might also try reinforced button holes. You sew the buttonhole like normal, except include a small piece of cord that gets sewn into the satin-stitched edge of the hole. I only know about these from the classes that came with my sewing machine. I love those Bernina people.